developed by OceanDataLab

Tutorials

SEAScope viewer

All platforms

Several versions of the BlueMarble worldmap from NASA are available on our server, we did not include them in the SEAScope package because these files are quite heavy and some of them are only supported by high-end graphic cards.

Graphics cards (GPUs) not only have a limit on the number of pixels an image can have, but also on the width and height of the image: even if the number of pixels fits in the GPU's memory, if the image width is much bigger than its height (or the opposite) then it might exceed the GPU's limit and it will not be possible to load it.

As all GPUs are not the same, the number of pixels and the dimensions limits vary between computers.
We offer background images at various resolutions to accommodate most GPUs, both in png and jpg formats.

Note that at the same resolution both formats will take the same amount of memory on the GPU, the file sizes differ due to how each format compresses the data (lossy compression has been enabled for jpg, so file sizes are smaller but some compression artefacts may be visible when zoomed in):

These worlmaps have been created from Blue Marble: Next Generation +Topography and Bathymetry (December 2004).
Blue Marble: Next Generation was produced by Reto Stöckli, NASA Earth Observatory (NASA Goddard Space Flight Center). When using or republishing Blue Marble: Next Generation please credit “NASA Earth Observatory.”

Once you have downloaded a worldmap:

  1. open SEAScope
  2. go to the Settings tab in the side menu
  3. under the Misc section, in the Background image field select/input the path of the image you downloaded
  4. close and restart SEAScope

If you try to use a worldmap whose dimensions are not supported by your GPU, SEAScope will simply render the Earth as a black globe and your graphics driver may issue an error message in the logs.

In case these worldmaps don't suit your needs, you can generate your own, SEAScope only needs the image to:

  • have a width twice the size of its height (width/height ratio = 2:1)
  • have a width below the texture size limit of your GPU
  • be in png, jpg, bmp or tga format

You can add you own pictograms to SEAScope and use them to represent the trajectory positions that match the current time

Instructions for adding custom pictograms

SEAScope only supports pictograms in PNG format that contain 4 channels (3 for primary colors and 1 for transparency).

The images should be square with a maximal size of 256x256 pixels.

Please note that SEAScope will rotate the images so that the bottom side faces the previous position in the trajectory and the top side faces the next position.

To add you own pictograms, you first have to locate your "custom" directory, the easiest way to achieve this is to:

  1. start SEAScope
  2. open the Settings tab in the side menu
  3. copy the value of the "Custom" field in the "Paths" section

If you inspect the content of this "custom" directory you should see that it contains a directory named "icons": simply copy your pictograms in this "icons" directory, restart SEAScope and you should now be able to choose your pictograms in the rendering configuration of trajectory collections!

Linux

You can follow these instructions to populate a vanilla SEAScope installation with data samples

Instructions to install the OTC2023 bundle (simply change the URL for other bundles/collection archives/case studies)
# Go to the seascope directory
cd seascope

# Download the bundle
wget 'https://seascope.oceandatalab.com/data/idf_samples/light_samples_OTC2023.tar.gz' \
     -O '/tmp/archive.tar.gz'

# Extract its content in the directory where you store IDF files (the "data" directory)
tar xzf /tmp/archive.tar.gz -C data

# Regenerate the SEAScope index
rm -f index.fb
./seascope
  
macOS

You can follow these simple instructions

  1. Download the data bundle
  2. Drag and drop the downloaded bundle on the SEAScope icon in Finder or the dock
  3. Wait for it to finish
  4. Restart SEAScope and choose to rebuild the index if asked
Windows

You can follow these simple instructions

  1. Download the data bundle in zip format
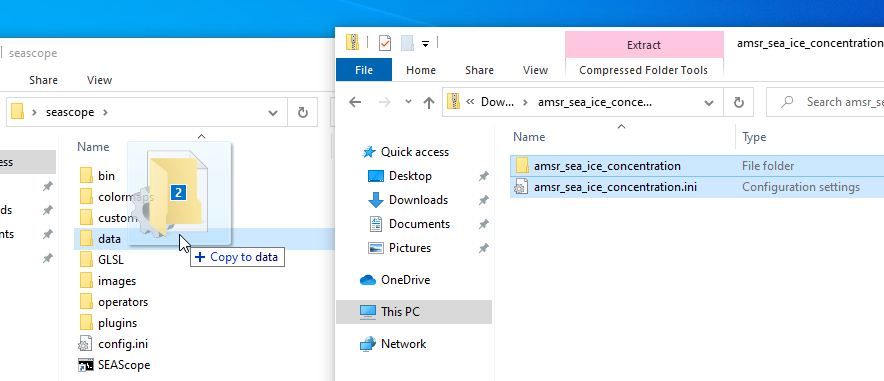
  2. Double-click on the downloaded file to display its content (it will open an Explorer window, do not close it yet)
  3. Open the SEAScope's directory in Windows Explorer
  4. Drag and drop all the files and directories from the archive's content to the data subdirectory in SEAScope directory Drag and drop archive content to SEAScope's data directory
  5. Restart SEAScope and choose to rebuild the index if asked

Python Bindings

Data loading notebooks

Training material